Designing a Probability List
This guide will walk you through the process of creating and customizing Probability Lists using the RNGNeeds plugin.
If you're new to RNGNeeds and want to learn how to add a ProbabilityList to your class, we recommend checking out the Getting Started page. It provides step-by-step instructions to help you integrate Probability Lists into your project.
Adding and Removing Items
To add items to your Probability List, simply click the "Add" button. Each entry you add represents an item along with its associated probability. If you need to remove an item, click the "X" button next to the corresponding entry.
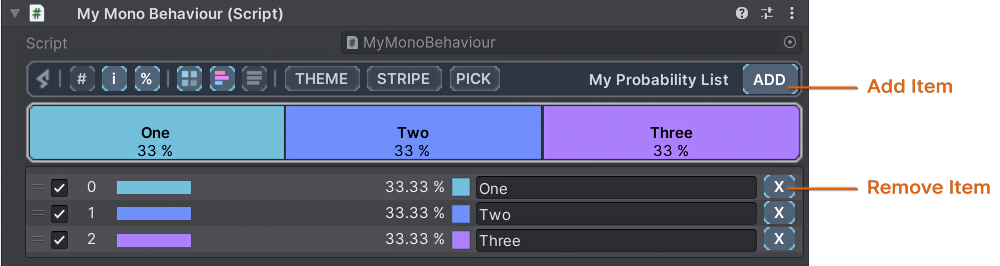
When you add or remove items, the system automatically recalculates their probabilities proportionally to maintain the original ratios. When you add an item through the inspector, it receives a share of the total probability equal to 1 / number of items. This rule also applies when you add an item via code without specifying the probability.
Adding / Removing Items in code
// Manually add ProbabilityItems
myProbabilityList.AddItem(new ProbabilityItem<string>("One", .5f));
myProbabilityList.AddItem(new ProbabilityItem<string>("Two", .1f));
myProbabilityList.AddItem(someProbabilityItem);
myProbabilityList.NormalizeProbabilities();

// Alternatively, let ProbabilityItems be created automatically
myProbabilityList.AddItem("One", .5f);
myProbabilityList.AddItem("Two", .1f);
myProbabilityList.AddItem("Three", .3f);
myProbabilityList.NormalizeProbabilities();

// If you don't specify a probability, the list will be normalized automatically
// to ensure the new item gets some share of the total probability
myProbabilityList.AddItem("Four");

// AddItem method and overloads return the newly created ProbabilityItem
var newItem = myProbabilityList.AddItem("Five");
newItem.Value = "New Value";
newItem.BaseProbability = 0.2f;
newItem.Enabled = false;
// etc.

// Removing items
myProbabilityList.RemoveItem("One");
myProbabilityList.RemoveItem(someProbabilityItem);
myProbabilityList.RemoveItemAtIndex(1);
Assigning Values to Items
Values in a ProbabilityList function similarly to those in a standard generic List. When working with value types, you can directly set the values within the entry according to their respective type.
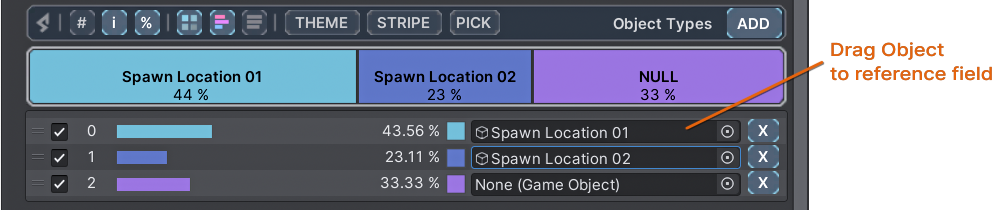
For reference types that are Unity objects (such as MonoBehaviours or ScriptableObjects), you can drag and drop the object into the object field of the entry.
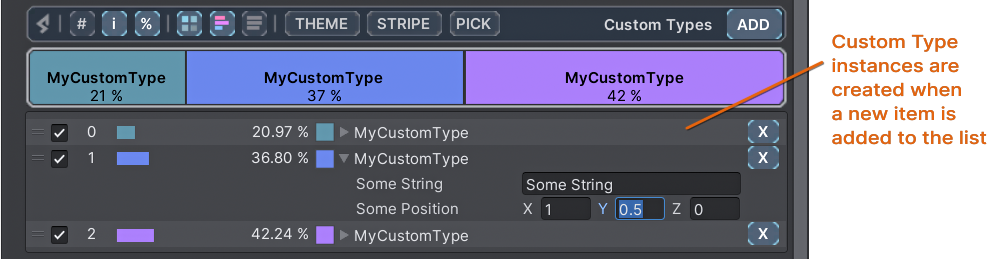
If you're working with custom types, their contents will be displayed directly in the entry. You can expand or collapse them using the foldout arrow.
Assigning values in code
myProbabilityList.GetProbabilityItem(1).Value = "New Value";
Displaying Names and Values
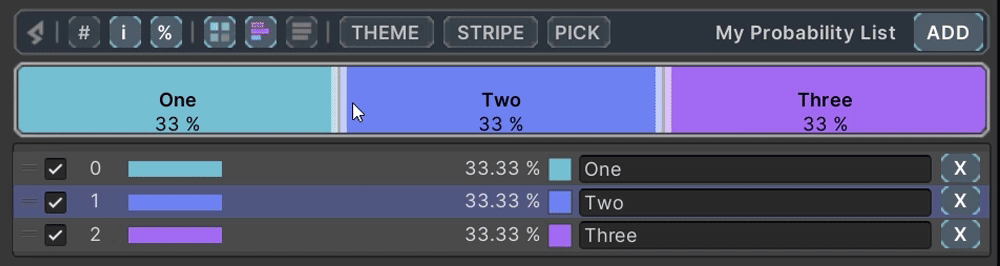
To provide a visual representation of the object/class name or the value for value types, the stripe displays them in colored blocks. This feature allows for quick identification and easy differentiation within the Probability List.
Setting Item Properties
To adjust probabilities for items in your Probability List, you can interact with the stripe by dragging the edges of the blocks or the blocks themselves.
The enabled state of an item can be toggled by clicking on the switch located on the left side of the entry.
If you want to prevent an item from changing its probability (e.g., during normalization), you can lock its probability by clicking on the colored square next to the percentage value.
- Control & Shift: These keys provide additional functionality for interacting with the stripe. Holding the Control key while left-clicking on the edge between blocks will evenly distribute the neighboring probabilities. Holding the Control key while hovering over a block allows you to adjust probabilities using the scroll wheel. Holding Shift along with Control while using the scroll wheel provides more refined adjustments.
- Direct Probability Input: By clicking on the percentage value in the entry, an input field will be revealed, allowing you to specify the probability directly. After confirming the probability, the probabilities of other items will be recalculated accordingly.
- Picks and Disabled Items: Disabled items will not be selected during the selection process. However, if a pick would have resulted in selecting a disabled item, the selection would be empty. You can learn more about how disabled items behave on Selecting Values page.
Setting Item Properties in code
myProbabilityList.SetItemEnabled(1, false);
myProbabilityList.SetItemLocked(2, true);
myProbabilityList.SetItemBaseProbability(0, .3f);   // will normalize the list after change
Pick Counts
The Pick Counts feature allows you to control the number of items picked from the list in a single selection process. By default, the selection will pick one value from the list. If you need to select multiple values, or a random range of values, you can customize the settings in the PICK section of the drawer.

By default, the minimum and maximum pick counts are linked, meaning the pick count is fixed at a specific value. To unlink the minimum and maximum pick counts, click on the link icon between the input fields. Once unlinked, you can set the minimum and maximum pick counts independently. The pick count will then be a random number between the specified minimum and maximum values.
You can also use the Curve field to bias the random pick count. By adjusting the curve, you can influence the probability distribution of the pick counts. Using custom pick counts and the curve feature adds an extra layer of control and variability to your RNG needs. It allows you to create more dynamic and diverse gameplay experiences by influencing how many items are selected in each pick.
Setting Pick Counts in code
// Setting a random pick count range between 2 and 5
myProbabilityList.LinkPickCounts = false;
myProbabilityList.PickCountMin = 2;
myProbabilityList.PickCountMax = 5;
myProbabilityList.PickCountCurve = myCustomCurve;

// From this point, the selection will pick 2 values
myProbabilityList.LinkPickCounts = true;
Customizing the List
If you wish to further customize your Probability List, including adding custom information and colors, you can do so by implementing the special interfaces IProbabilityItemInfoProvider and IProbabilityItemColorProvider
in your custom class. For more details on how to customize your list, refer to the
Customizing Lists page in our documentation.
With these guidelines, you're now ready to start designing your Probability Lists with RNGNeeds. Unleash your creativity and leverage the power of probability distribution in your game mechanics!