Monster Spawner
Unleash the beasts with RNGNeeds' Monster Spawner sample. Utilizing Probability Influence, this example dynamically controls the spawning of various monsters based on location and other factors. Whether you're designing a horror game or a fantasy adventure, the Monster Spawner provides an inspiration how to dynamically alter odds in runtime.
Dynamic Probability
The Monster Spawner sample showcases the usage of Probability Influence system, which allows dynamic control over individual probabilities based on external factors. This is a very powerful feature of RNGNeeds, which opens up a world of creative game design by breathing life into fixed odds, turning them into engaging game mechanics.
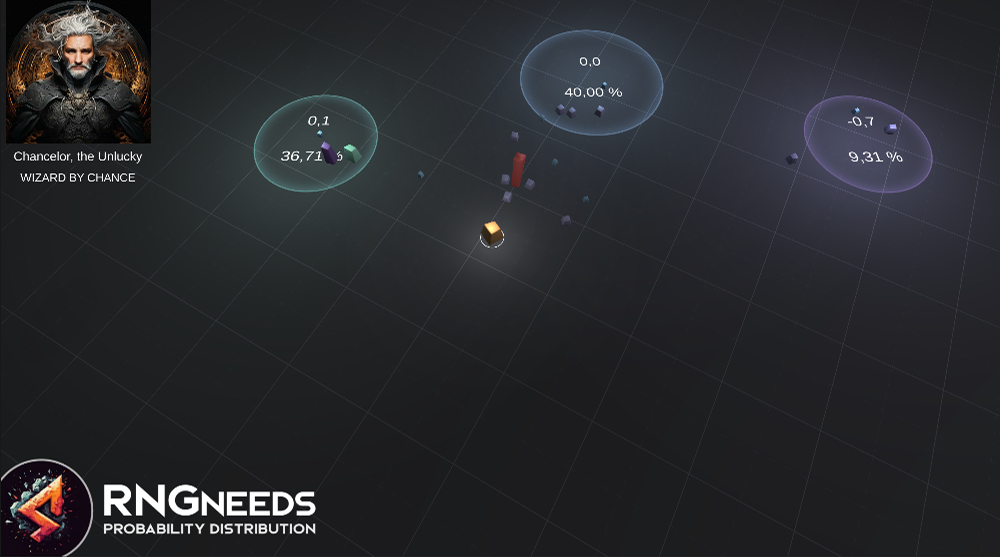
In our sample, monsters will spawn with varying probability based on the player's distance to spawn locations. Their designed odds will dynamically change, ensuring the hero is attacked from locations close to him, yet still having some small chance of spawning them in all locations. This time you control Chancellor, the Unlucky, a misfortunate fellow who happened to pop into existence in the middle of a monster graveyard. Let's give him a lucky break - for simplicity's sake, he can banish the monsters merely by walking over them.
The Sample Structure
First, let's explore the structure of this sample. Locate and open the MonsterSpawner scene, and inspect the MonsterSpawner GameObject within its hierarchy.
The attached MonsterSpawner script holds three Probability Lists of different types:
- Monster Types - this list is of type
Monster(Scriptable Object) and will handle random monster picks - Monster Levels - provides a random
intwhich will define the monster level - Spawn Locations - this list provides
SpawnLocationtype, which is a MonoBehaviour placed in the scene
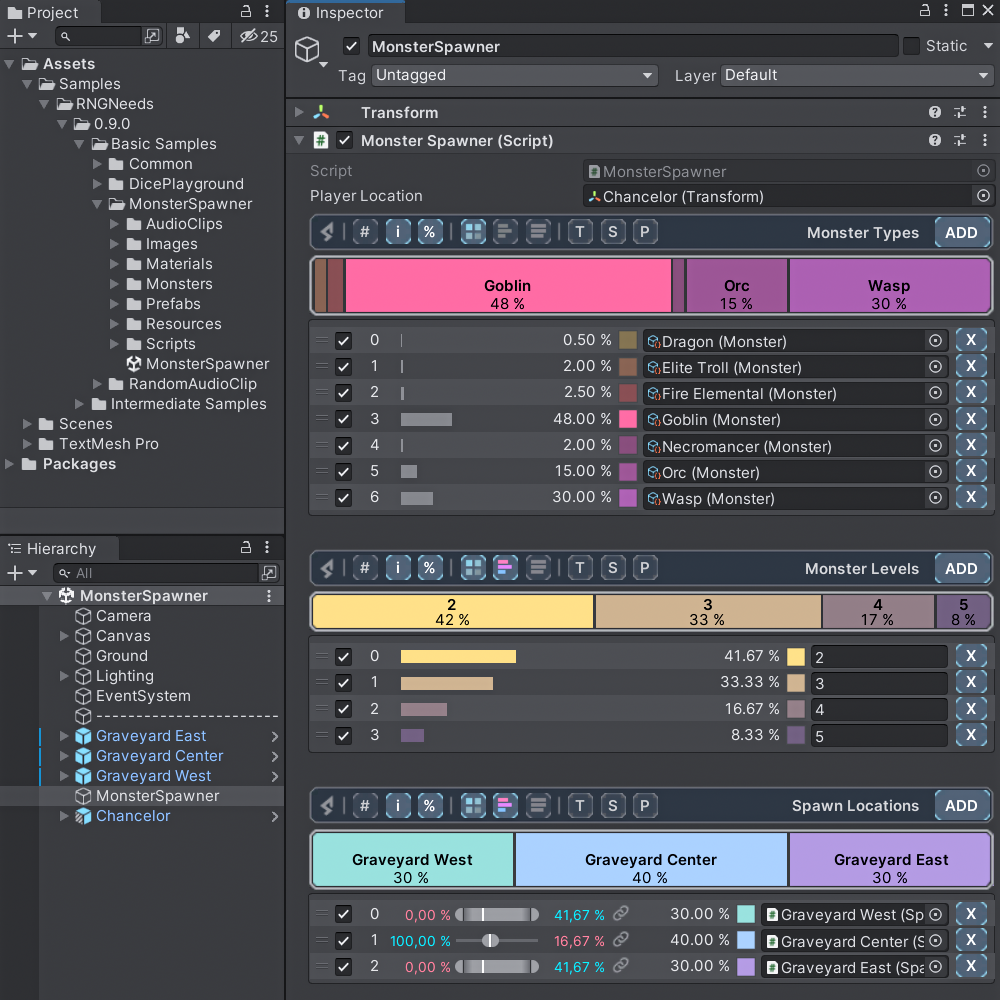
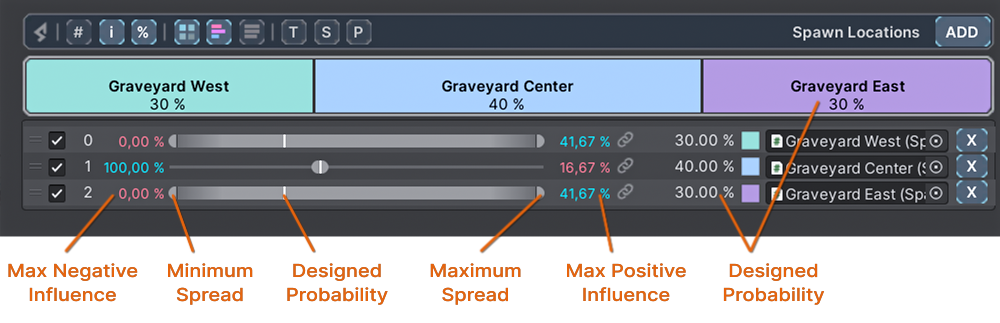
As you can see, all items in lists have a designed probability. However, take a closer look at Spawn Locations. The Center location has 40% chance, East and West locations have 30% each. In addition, all locations are "influenced" - instead of a probability bar similar to items in other lists, sliders with handles are displayed in their place for items that are influenced.
The sliders define the minimum and maximum Influence Spread - setting limits for positive or negative influence. For instance, maximum positive influence will raise the probability to the value of the right (maximum) slider handle. While playing the mini-game, try moving the handles to change the degree of influence.
To learn more about this concept, its philosophy and details of usage, please visit the Probability Influence page.
For the purposes of our example, we will only care about the result - the probability of spawning a monster at a location will depend on the player's distance to it.
Monster Spawner Code
Take a closer look at the MonsterSpawner MonoBehaviour code. The logic for determining the monster type, its level, and where to spawn it is quite straightforward.
- First, a
MonsterScriptable Object is selected from the Monster Types Probability List. - Next, the code attempts to select a
SpawnLocationMonoBehaviour Component. The "attempt" is necessary because if all the spawn locations have maximum negative influence, no value would be picked and returned. - Then, the Monster Prefab is spawned at the selected location.
- Finally, a random monster level and the player's location are sent to the
MonsterControllerMonoBehaviour Component. The level will define the monster's speed at which it will chase the player, knowing its location.
Monster Spawner Code
public class MonsterSpawner : MonoBehaviour
{
    // non-relevant code was omitted

    public Transform playerLocation;
    public ProbabilityList<Monster> monsterTypes;
    public ProbabilityList<int> monsterLevels;
    public ProbabilityList<SpawnLocation> spawnLocations;

    private void Start()
    {
        InvokeRepeating(nameof(SpawnMonster), .5f, .5f);
    }

    public void SpawnMonster()
    {
        Monster monster = monsterTypes.PickValue();
        if (spawnLocations.TryPickValue(out var location) == false) return;
        var monsterObject = location.Spawn(monster.monsterPrefab);
        var monsterController = monsterObject.GetComponent<MonsterController>();
        monsterController.SetStatsByLevel(monsterLevels.PickValue(), playerLocation);
    }
}
Power to the Designer
The content of the selection is defined in the inspector by the designer, who has the ability to change the gameplay experience as they wish. For instance, they might choose to spawn only Level 2 Goblins from the Center Location, thereby removing the RNG aspect. By adopting this philosophy, and if the coder also exposes the spawn frequency to the designer, any type of spawn mechanic can be created.
Feel free to experiment in Play Mode. Left-click to select Chancelor (the yellow object), and right-click on the ground to initiate movement. In each spawn location, you'll see two numbers. The top number represents the incoming negative or positive influence, ranging from -1 to 1. This value is calculated based on the player's distance to that location. The bottom number is the resulting probability, indicating the chance that a monster will spawn at this location.
You can change the MonsterSpawner Component's settings, probabilities, or influences on the fly. By dragging the spread slider handles, you can set the limits on how influence alters the probabilities.
If you take a closer look at the center location, you might notice that its spread slider is snapped to the white line. Since the white line represents the designed probability (in this case, 40%), there is no spread. This means that for the center location, the influence will have no effect, and the probability will always remain at 40%. If you raise the slider's right handle, you'll allow positive influence to increase its probability. The same principle applies to the left handle, which controls negative influence.
To learn more about this concept, its philosophy and details of usage, please visit the Probability Influence page.