Probability Influence Guides
This collection of guides is dedicated to utilizing the concept of dynamic probability. To learn more about the concept, visit the Probability Influence page of our documentation.
Have a use case in mind that we should explore on this page? Join our Discord community and share your thoughts.
Quick Setup Guide
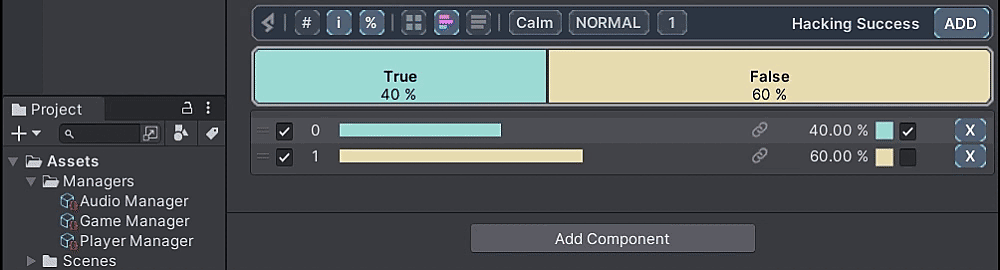
For a quick start with dynamic probability, let's use a ProbabilityList<bool> as an example. Simply declare the list in your script:
public ProbabilityList<bool> hackingSuccess;
Then, add two items: True and False and set the probability of True value to 40%. This will be the base probability of a player succeeding in a hacking attempt.
Dynamic probability settings are hidden by default to keep the interface clean for newcomers. Let's go ahead and enable them.
Enabling Influence Options
Probability Influence is nestled within the Advanced Features, which are not visible by default. To access these capabilities, follow these steps:
-
Activate Advanced Drawer Options Level: Navigate to the Preferences window and switch Drawer Options Level to Advanced. Activating this global setting will reveal advanced features across all your Probability List inspectors.
-
Access Additional Drawer Options: Click on the RNGNeeds symbol located at the top left corner of your Probability List inspector to unveil the Additional Drawer Options.
-
Enable Influence Display: Toggle the Show Influence Toggle button to on. This action will introduce a link button adjacent to the probability preview bars within your list items.
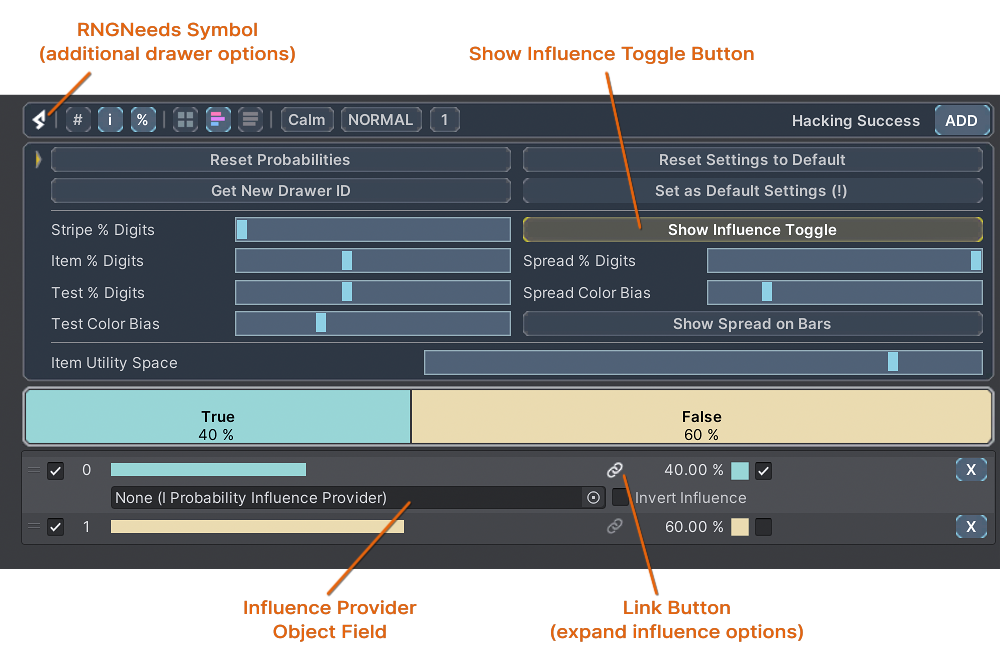
- Assign Influence Providers: Clicking on the link buttons allows you to expand or collapse the Influence options for each item, revealing an object field. Here, you can drag and drop an Influence Provider object to begin dynamically adjusting item probabilities based on external factors.
Creating an Influence Provider
We need something to adjust our item's chances based on what's happening in the game. Let's make a ScriptableObject that keeps track of the player's stats.
This object will serve as the provider of influence.
Here's a simple way to make a manager for the player's stats:
Simple Player Manager
using RNGNeeds;
using StarphaseTools.Core;
using UnityEngine;

[CreateAssetMenu(fileName = "Player Manager", menuName = "RNGNeeds/Probability Influence Guides/Player Manager")]
public class PlayerManager : ScriptableObject, IProbabilityInfluenceProvider
{
    [Range(1, 30)]
    public int hackingSkillLevel;

    public float ProbabilityInfluence => ((float)hackingSkillLevel).Remap(1, 30, -1, 1);
    public string InfluenceInfo => $"Increase by Hacking Skill Level\nCurrent: {hackingSkillLevel} LVL = {ProbabilityInfluence:F2} Influence";
}
The Player Manager implements the IProbabilityInfluenceProvider interface, featuring two key properties:
float ProbabilityInfluence- This property supplies the influence to our Probability List. Here, we convert the hacking skill level from a scale of1 to 30into a range of-1 to 1.string InfluenceInfo- This property explains the logic and current values to the game designer. This information appears in the inspector once the provider is linked to an item.
Once you've created the Player Manager Scriptable Object, simply drag it into the Influence Provider Object Field for the True item.
After assigning the provider to the item, you'll notice a new slider with adjustable handles replaces the original probability preview bar. These handles let you set the Spread - limits for how much the player's skill can affect the hacking success chance — essentially controlling the influence's impact.
We've configured the spread to ensure that the maximum negative influence reduces the success chance to 25%, while the maximum positive influence boosts it to 50%.
Now, determining the outcome of a player's hacking attempt is straightforward. Just use the .PickValue() method.
if(hackingSuccess.PickValue())
{
    // Successful system breach
}
This method call evaluates the player's hacking success based on the dynamically influenced probabilities, making each attempt's outcome reflect the player's current skill level.
And that's all there is to it! As the player improves their hacking skills, you'll see a gradual increase in their success rate, directly reflecting their progress in the game.
The principles of applying influence can be extended to various creative scenarios. For example, imagine you want to increase the monster spawn rate based on the music volume—a mechanic where louder music leads to more intense battles. Here's how you could set this up:
- In your script, declare
public ProbabilityList<bool> shouldSpawnMonster;and add True and False as values. Set the probability for True to 30%. - Have your Audio Manager implement the
IProbabilityInfluenceProviderinterface. - Map the music volume to an influence range with the
ProbabilityInfluenceproperty. For example,public float ProbabilityInfluence => musicVolume.Remap(.5f, 1f, 0f, 1f);will adjust the influence from 0 to 1 as the music volume increases from 50% to 100%. - Link the Audio Manager as the Influence Provider for the True value in your list.
- Set up a method to attempt monster spawning every second. With a base spawn chance of 30%, you'd expect a monster spawn roughly every three seconds. However, as the player turns up the music volume above 50%, the spawn rate will increase accordingly.
private void Start()
{
    InvokeRepeating(nameof(SpawnMonster), 1f, 1f);
}

public void SpawnMonster()
{
    if (shouldSpawnMonster.PickValue())
    {
        // Code to spawn the monster
    }
}
This example illustrates how dynamic probability can be used to create a unique and engaging game mechanics that react to the game environment, player actions or even system settings.
Using Probability Influence in Code
In this guide, we'll explore how to implement and manage dynamic probability through code. RNGNeeds facilitates equal control for both coders and game designers over Probability Lists, ensuring a collaborative workflow.
Our focus will be on creating a Weapon MonoBehaviour Component. This component will not only manage the logic for critical strike chances based on weapon attributes but will also act as an Influence Provider for its Probability List.
Setting up the Weapon Component
Begin by crafting a Weapon.cs script that extends MonoBehaviour and conforms to the IProbabilityInfluenceProvider interface.
Weapon Component - Fields & Properties
using RNGNeeds;
using StarphaseTools.Core;
using UnityEngine;
public class Weapon : MonoBehaviour, IProbabilityInfluenceProvider
{
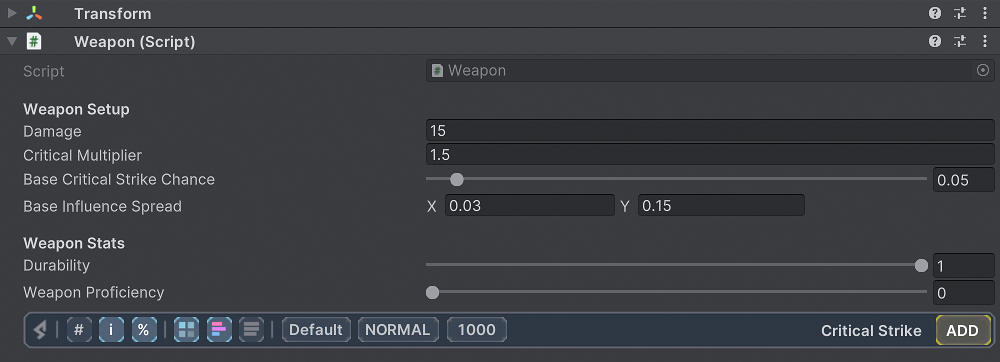
[Header("Weapon Setup")]
public float damage;
public float criticalMultiplier;
[Range(0f, 1f)] public float baseCriticalStrikeChance;
public Vector2 baseInfluenceSpread;
[Header("Weapon Stats")]
[Range(0f, 1f)] public float durability = 1f;
[Range(0f, 1f)] public float weaponProficiency;
public ProbabilityList<bool> criticalStrike;
private float Effectiveness => weaponProficiency * durability;
// Interface Implementation
public string InfluenceInfo => $"Effectiveness = Proficiency {weaponProficiency:F4} x Durability {durability:F3}\n=> Current: {Effectiveness:F2} = {ProbabilityInfluence:F2} Influence.";
public float ProbabilityInfluence => Effectiveness.Remap(0f, 1f, -1f, 1f);
}
The Weapon Setup section is designed for game designers to define fundamental weapon characteristics.
By attaching this component to a GameObject, they can configure essential stats such as damage, criticalMultiplier, and the baseCriticalStrikeChance, which represents the chance of a critical hit without any influence.
The baseInfluenceSpread Vector2 value sets the range for minimum and maximum influence on critical strike chance, customizing the dynamic probability to fit the weapon's gameplay purpose.
The Weapon Setup section contains attributes that are dynamically calculated during gameplay to adjust the critical strike odds based on the weapon's Effectiveness property.
In this example, Effectiveness is determined by multiplying weapon proficiency by durability.
As proficiency increases with use, decreasing durability serves as a balancing factor on influence, encouraging players to maintain their weapon's condition.
Finally, in the Interface Implementation part, the influence is determined by mapping the Effectiveness (0 to 1) to an Influence range of -1 to 1.
Initialization
Now, let's initialize the Probability List and configure its influence settings. Add the following Start() method to your Weapon Component:
Weapon Component - Initialization
private void Start()
{
    criticalStrike.ClearList();
    var trueItem = criticalStrike.AddItem(true, baseCriticalStrikeChance);
    var falseItem = criticalStrike.AddItem(false);

    trueItem.InfluenceProvider = this;
    trueItem.InfluenceSpread = baseInfluenceSpread;

    falseItem.InfluenceProvider = this;
    falseItem.InfluenceSpread = new Vector2(1f - baseInfluenceSpread.y, 1f - baseInfluenceSpread.x);
    falseItem.InvertInfluence = true;
}
Initially, we clear the Probability List and add two items: True and False. The True item receives the base critical strike chance defined by the game designer as its probability.
Subsequently, the Weapon component is designated as the Influence Provider for the True item, and the specified Spread is applied.
For the False item, we assign the same Influence Provider but with an inverted influence, adjusting its Spread accordingly.
For details on the significance of inverting influence and its effects, please see the Probability Influence page of our documentation.
Adding Attack Logic
The final step is to implement some logic for our weapon. Let's create an Attack() method with the following code:
Weapon Component - Attack Logic
public (float damage, bool critical) Attack()
{
    if (criticalStrike.PickValue())
    {
        weaponProficiency += 0.001f; // Slightly increase proficiency with each attack
        durability -= 0.005f; // Decrease durability with each critical hit
        return (damage * criticalMultiplier, true); // Return increased damage for critical hits
    }

    weaponProficiency += 0.0001f; // Minimal proficiency increase for normal hits
    return (damage, false); // Return normal damage for non-critical hits
}
This method simulates an attack with the weapon, adjusting the weapon's proficiency and durability based on whether the attack is critical. Each attack slightly increases the weapon's proficiency, encouraging continuous use. Critical hits, while more powerful, also reduce the weapon's durability, adding a strategic layer to weapon usage.
The method returns the damage dealt and a boolean indicating whether the attack was critical, allowing for easy integration into broader game mechanics.
Have a use case in mind that we should explore on this page? Join our Discord community and share your thoughts.